First let me say, that although my roll cookie is fantastic to work with, decorating these cookies, if you do it like this, with all of these variations, takes a LOT of time. It took me about 10 hours to decorate 65 cookies. If you are going to making these with kids, stick to the easy decorating - patterned 'fabric', tie-dye with or without the 3-D flowers, etc. On the other hand, if you have the time or inclination to make many different ones, these are the cutest things and everyone will love them. Don't let the fondant icing scare you away - it's homemade marshmallow fondant, which tastes good and is pretty easy to make.
Before you start, you'll need to buy the
cookie cutter set. I wanted the mini cookies (about 2-inches) because I knew that I would be making other desserts. I bought a set that included the the onesie cookie cutter and a bib cutter (which I didn't use) and 3 texture mats. If you search on Amazon for 'Onesie cookie cutter', this item will come up - Texture Cookie Cutter Set-Mini. This will give you the duck, ABC and striped designs.
You also need some
food coloring,
good brushes (Loew-Cornell) - the pointy one in the middle is the one I used most for painting the detail. The left-hand brush was used for brushing off excess powdered sugar, and the one on the far right was great for brushing on
luster dust for a shimmery look (it's a very inexpensive watercolor brush that I bought in the supermarket).
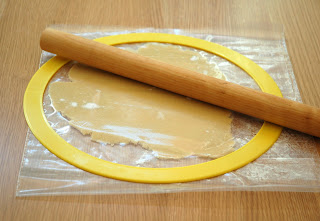
nonstick fondant rolling pin
Long rolling pin and Perfect-A-Pie (rings) - Available from
http://www.fantes.com/ (nice to have but not required - this will help you to roll the dough and the fondant to a consistant thickness)
Makes 75 Mini Onesie Cookies
Ingredient List
2 packages (10 ounces each) miniature marshmallows
4 pounds powdered sugar
1/2-1 cup solid vegetable shortening (Crisco)
3-1/2 teaspoons vanilla or other flavoring
3 sticks (12 ounces) unsalted butter
1 teaspoon salt
1 large egg
4 cups ( 520 grams) all-purpose flour, fluffed, scooped and leveled into measuring cups
6-8 tablespoons pasteurized egg whites (about 3 egg whites)
1/2 teaspoon cream of tartar
corn syrup
food coloring
2.5 gallon ziptop bag - not required but very nice for rolling out dough and fondant
--------------------
Ingredients will be repeated for each recipe - they are INCLUDED in the ingredient list, above.For the Marshmallow Fondant2 bags (10 ounces each) miniature marshmallows
4-10 tablespoons water, divided
9-1/2 cups powdered sugar divided
2 teaspoons vanilla, or other flavoring, divided
It will probably be too hard to make all of the fondant at once, so use the directions below and make it twice:
Place 10-ounces of marshmallows and 2 tablespoons of water in a microwave-safe bowl. Microwave 30 seconds on high; stir until mixed well. Continue microwaving 30 seconds more; stir again. Continue until melted (about 2 1/2 minutes). Stir in 1 teaspoon vanilla.
If you want to make the fondant in a heavy-duty mixer, grease the bowl well with some of the vegetable shortening. Add 4-1/2 cups of the powdered to the mixer bowl. Grease a spoon and spoon the melted marshmallow mixture into the greased bowl. Mix the ingredients together on low until the mixture becomes dough-like. You can now use a dough hook, or knead the mixture by (greased) hands on a greased countertop, until the mixture is smooth and non-sticky. Add more water or up to another 1/4 cup of sugar to get the texture the way you want it. It should not crack, nor should it be overly sticky by the time it is finished. It should be supple and smooth. Repeat with the remaining ingredients to have 2 batches of fondant.
If not using a mixer, add about 4 cups of sugar to the marshmallow mixture. Stir with a greased spoon until shaggy. Place 1 cup of powdered sugar on a countertop and transfer the mixture to the powdered sugar. Knead together (with greased hands), adding more water (up to a total of 5 TB per batch) as necessary to get the powdered sugar completely mixed in and the ball of fondant smooth and supple, but not overly sticky.
If you know what colors you want, it's easier to knead it in now, while the fondant is still soft. You might want to wear gloves when kneading in color. I used a toothpick to spread a small bit of color onto the fondant, and then kneaded it in, adding more color as necessary. After you are done, coat the fondant with solid shortening, wrap in plastic and place into a plastic bag. Let the fondant rest at least overnight. For longer storage, place it in the refrigerator. If refrigerated, it will be very firm when you take it out. It can be softened in the microwave prior to using, but don't overdo it. Depending on the size of the ball (you may have broken off small balls to color them), it could take a few seconds on power 1 or 2, or up to 10 seconds on power 1 or 2. Better to under heat than over, because over heated fondant will be too soft to work with, and it will get stale as it cools. It will keep in the refrigerator for several weeks.
For the cookies3 sticks (12 ounces) unsalted butter – cool room temperature
1 teaspoon salt
1 teaspoon vanilla
1 large egg, room temperature
4 cups ( 520 grams) all-purpose flour, fluffed, scooped and leveled into measuring cups
up to 4 teaspoons room temperature water, if needed
Preheat the oven to 350 degrees F. with shelves in the bottom and top thirds of the oven. Line 2 cookie sheets with parchment paper.
In a large mixer bowl beat together the butter, sugar, salt and vanilla extract on low to medium speed, just until well blended.
Break the egg into a small bowl and fork-whisk until blended. Gradually beat the egg into the butter mixture.
Add the flour, all at once, to the mixer bowl, and beat on low speed until the mixture comes together into a dough. If the dough does not form, add the water a little at a time, using just enough to bring the dough together. Press the dough into a ball, wrap in plastic, and refrigerate for 15 minutes.
Cut the dough into 4 pieces and return 3 pieces to the refrigerator.
For a foolproof rolling method, cut open a jumbo zip-top bag so that it is hinged on one long side. Flour the inside of the plastic and place one piece of dough inside.
To roll dough to an even thickness, you can use a pastry board with a dropped bottom or a plastic dough ring that is the exact thickness needed (see picture, above). The rolling pin runs on the edges of the ring, or the pastry board, allowing the dough to be rolled to the exact thickness needed (see
Easy Dough Rolling Technique).
Roll the dough to 1/8-inch thick or slightly thinner. Cut out the dough using cookie cutters of your choice. Set the cookies on the prepared cookie sheets. Bake for a total of 12 -15 minutes, moving the top cookie sheet to the lower shelf and the bottom sheet to the top after half of the baking time, until the cookies are lightly browned around the edges. Slide the parchment onto cooling racks, and let cool completely before storing.
If using the cookies within 2 days, store covered with waxed paper to retain the cookies crispness. Otherwise, freeze the cookies for up to 3 months. Defrost them on wire racks, and then place in a storage container, loosely covered with waxed paper.
DecoratingRemove the fondant from the refrigerator and soften it as directed in the fondant section above. Cut three sides of a ziptop bag so that you have a hinged piece of large plastic. Sprinkle on a light coating of powdered sugar. Roll a piece of fondant out between the sheets of plastic to about slightly thicker than 1/16th inch, using the Perfect-A-pie Rings, mentioned above. You don't want to cut more than 5-10 pieces at a time, because they will dry out, especially if you are piecing together to make stripes, for example. If using the texture mats, you want to place them on the fondant, roll the nonstick fondant rolling pin over the mat and then use the cookie cutter to cut out the onesie shape. I like to use the texture mats with the convex side facing up, so that the design in the fondant will be raised not convex. It's easier to paint the raised designs than try and fill convex ones. Once you have them cut, brush a light coating of corn syrup onto a cookie and place the fondant on the cookie. Place the cookies on a cookie sheet and cover them with waxed paper to prevent them from drying out too much. You'll want to go back and paint these once you have all of the cookies done.
To make patterned onesies like these:
You can make the dominant color and the accent color reversed onesie at the same time. Roll out the two colors of fondant. In one of the pieces, cut out the accent pieces. For the ones above, I used a mini-poinsetta cutter, but you could use a star, circle, fruit blossom, or any other tiny cutter that you have or buy. Place the cut-outs on the other piece of dough, and roll the two together.
Now you can see that besides the patterned piece of fondant you have just made, you also have the purple piece with the cut-outs removed. Lift up the purple piece and set it on the unpatterned pink piece.
You can either roll the two together to make a patterned piece of 'fabric' in opposite colors from the one you just made, or you can affix the purple piece with corn syrup, making a onesie with depth. Now use the cutter to cut out the onesie, and affix it to the cookies with a light coating of corn syrup.
To make this onesie with dots, I cut out the circles from the purple piece and then affixed the purple piece to the cookie. Then I cut out the white and pink circles, and inserted them into onesie. If I had tried to roll the circles into the purple piece, they wouldn't remain round, although that probably would have been an interesting pattern, too.
To make wide-striped onesies, you can use the striped onesie texture mat. Roll out the colors you want to use, and press the texture mat into the main color. Cut out a onesie and then use a sharp knife to cut the onesie where you want the stripe to be.
To line everything up, I like to place the cut pieces on top of the piece for the stripe and recut everything so that I can make sure that the cuts will line up nicely, and then I place the cookie cutter back onto the onesie and recut it so that I know it's the right size.
Brush a cookie with corn syrup. Place one piece of fondant on the cookie and press down lightly so that it adheres well ( I usually work from the shirt downwards). Place the second piece on and push it upward so that it nicely abuts the first piece, and then put on the last piece.
In the picture below you can see that I used the texture mat on purple fondant to get the duck. I cut that piece rougly and then set it on top of the white fondant. Then I used the cookie cutter to cut the onesie through both layers of fondant, and then I cut out the white piece underneath the purple fondant. Then I attached everything as described above. You can see that when you do it that way, the onesie looks seamless like the stripe was woven right into the 'fabric'.
If you want to make a 3-D flower, cut out the shape with a tiny flower cutter (I used a gumpaste fruit flower cutter). Cup the flowers with your fingers or a wooden skewer, and let the flowers dry for 15 minutes on the skewers. This will dry them just enough so that they will retain some shape, but they won't be so dry that you wouldn't want to eat them, and they will still be soft enough to reshape them if you have cupped them too much.
If you are very gentle, you won't make a hole in the center, as I've done in the flower, below.
But whether you have a hole or not, you can put a tiny yellow ball of fondant in the middle to finish the flower. Attach the flowers to the fondant onesie with a dot of corn syrup, after the fondant has been affixed to the cookie. In the picture below, you can see the 3-D pink flowers and also some flat white flowers.
To make the tie-dyed onesies above, simply put some food coloring on the fondant, but don't knead it in completely.
You can also use luster dust to give the onesies a glittery effect.
At this point you could be done OR you could really punch up the designs by painting accents on the cookies. For that you need royal icing, which dries hard.
Royal IcingI use pasteurized egg whites that come in a carton. Don't follow the conversion chart (amount from carton to equal 3 egg whites), but instead just use the 3-5 tablespoons listed below. If separating out the whites from pasteurized shell eggs, be very careful not to get any yolk or grease into the whites or they won't whip up.
3-5 tablespoons pasteurized egg whites (about 3 egg whites)
3-3/4 cups and 1/4 cup powdered sugar, divided
1/2 teaspoon cream of tartar
1/2 teaspoon vanilla or other flavoring
water, as needed
Reserve 1/4 cup sugar and mix together all other ingredients. Beat for 7-10 minutes until the icing holds a strong peak, adding the remaining sugar if necessary.
Keep the bowl of frosting covered with a damp cloth to keep it from drying out. Divide the frosting into however many bowls of different colors you need. I used yellow or white (no food coloring) on the ducks, white with a tiny bit of purple in it to accent the white cookies, a few shades of purple for the ABC's and to punch up the purple multi-striped onesies, several shades of pink, etc. Here you can see that I've painted not only the duck and ABC but also the detail on the onesie. It really makes a difference!


