miércoles, 20 de junio de 2012

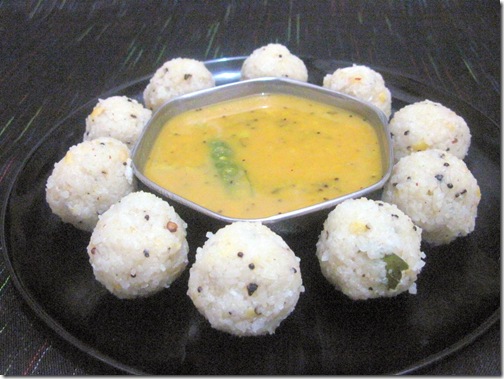
UPMA URUNDAI

Last weekend i was breaking my head thinking about wat to prepare for dinner.Finally i asked my hubby what he wanted to have. He told me to prepare upma urundai and also he said its been a very long time we prepared this.Yes , I agreed i totally forgot about this dish.Immediately i gave a call to my MIL for the recipe and made it. It was tasting soft  and excellent. Thanks to my hubby for reminding this yummy tiffin.Also i've got a different recipe to share with u all  :)

upma urundai1

INGREDIENTS :

  • Raw rice - 1 cup
  • Toor dal - 1/4 cup
  • Water - 2 cups

To temper :

  • Cooking oil - 1 tbsp
  • Mustard seeds - 1/2 tsp
  • Urad dal - 1/2 tsp
  • Asafetida /Hing - 1/4 tsp
  • Green chilly - 1 no ( cut into two)
  • Ginger - 1 inch piece ( cut into small pieces)
  • Curry leaves - A few

Salt & water - as needed.

METHOD:

  • Soak the rice and toor dal together for two hours.
  • Coarse grind the rice & dal mixture in a mixie. Run the mixie only once.(Please do not grind for more time) The rice & dal should be just broken.
  • Now in a broad kadai , temper all the items given above in the same order.
  • Add 2 cups of water and the required salt.Allow it to boil.Now add the ground rice mixture.Mix well for sometime without forming lumps.Let it thicken.
  • The rice absorbs all the water and becomes a non sticky dough.
  • Let it cool down. Now grease the idly plate with little oil. Make balls out of the dough and arrange it in the greased idly plate.Steam the balls for 10-15 mins.

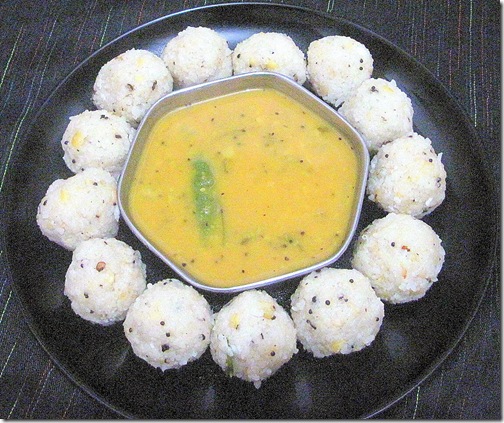
Soft , hot upma urundai is ready to serve. We enjoyed with the sambhar i made for lunch. U can have it with any chutney. Sometimes this can be made as a evening snack without any accompaniment.

upma urundai


martes, 19 de junio de 2012

domingo, 17 de junio de 2012

Becca's Baby Shower Bear Cake


After making marshmallow fondant for my last baby shower event, I was excited to try covering a cake with fondant.  I had been hesitant before, because commercial fondant doesn't taste very good, but marshmallow fondant tastes pretty good and doesn't have a lot of artificial ingredients in it.  The second drawback came when I saw that fondant shouldn't be refrigerated.  That doesn't work for me, because I usually use buttercream made with egg whites and butter.  I decided to use Marshmallow Fluff instead of egg whites, but I wouldn't sacrifice the butter.  Somewhere along the road, I read that if the cake were kept at 45 degrees, the fondant would be okay.  Since I have a second refrigerator, it was easy to make that adjustment, and as you can see from the picture, the fondant came out beautifully.  The lettering is done with Wilton Sugar Sheets, and I didn't know how they would do refrigerated either, but they seemed to be fine as well.

I made the bear a week in advance to give it time to firm up so that I could easily move it to the cake.  It took an entire recipe of marshmallow fondant, and I added the green while the marshmallows were melted. This way I didn't have the arduous and messy task of kneading in the green.  (I needed some black and pink fondant, which came from the white batch that I made to cover the cake). Work on a piece of waxed paper, so that you can move the bear after it has been made.

Start with the legs.  They need to be fatter at the top (the hip/thigh part) and taper to the foot.  Just bend the bottom of this piece to make the foot, which you can perfect after the bear is assembled.

The legs are going to attached midway, or slightly farther back from the center of the body.


Once the legs are made, the body can be shaped.  It needs to be pear-shaped so that it comes down between the legs.  Make the body taller and thinner than it needs to be.  The head is going to weigh it down so that the finished bear will be shorter and fatter than you started. Attach the legs with a little water.


The arms get fashioned in the same manner as the legs with the top shoulder/bicep fatter than the hand.  If you have the arms too long, you can always pinch off some to get them right once you have the bear all assembled.

For the head, start with a round ball about 1/3 the size of the body.  Put a toothpick or stick of spaghetti into the body and then stick the round ball on.  Once you have the ball stuck onto the body, you'll be able to see if it is proportioned right.  If it isn't right, you get something that looks more like a pig, so just keep playing with it until it looks right.  The snout, nose and eyes, though will really start making it look like a bear.


Some directions for teddy bears have the snout be flat and oval, but mine just didn't look bearlike until I made the snout stick out and be more triangular.  Once you have it the shape you like, attach it with water.


Color a small bit of fondant with either dark brown or black coloring.  Make the nose a reverse triangle from the snout.  My bear has a substantial nose!  I think it could be smaller and still be very bearish.  The eyes, on the other hand, need to be pretty small to be right, and to me they seem to look best if they are touching the snout rather than farther up on the head.  The mouth is easiest made with an edible marker.

For the ears I flattened a very small ball of green fondant, and then made them slightly concave.  I used a fondant ball tool to make the indentation for the pink fondant.

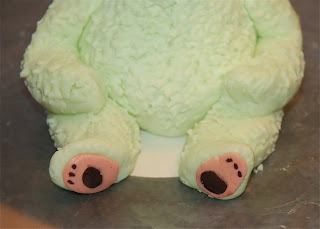
To add the final touches. put on the pink foot pad with a small brown pad at the bottom.  For the toes use the edible marker.  The toes can either be on the pad like I did, or off the pad on the green part (these are the claws, so they can even be right at the edge of the green part of the foot).


To make the fur, use a small scissor to make tiny clips into the fondant, which will stick up and look like fur.  Lastly, score the head/snout area so that it looks like the head has been stitched.  I used a flat toothpick, but there is a fondant tool for this purpose, if you have one.

Slide the waxed paper and bear onto a cardboard round and set aside to dry for 5-7 days at least. Once the bear has dried out, you'll be able to lift him off of the paper and onto the blanket, or wherever else you like.

For the blocks:
The blocks came from a Wilton design, which you can find at http://www.wilton.com/idea/Baby-Block-Cake.  For the round cake, I had to proportion the blocks smaller, but you'll  have to adjust them to the size cake you make (mine was 12-inches).   To see if the proportions would work, I cut the blocks out of paper and laid them on an upside down cake pan.  Once I had the right size block, I printed out letters on my computer, testing out different fonts and sizes to get the one I liked best, and the size that looked good on the block size I had chosen.  After you do that, you can use the Wilton instructions for cutting out the Sugar Sheets and applying the sanding sugar.  A word of caution - you can't pipe and sprinkle all of the blocks with the sanding sugar, and then hope to transfer them to the cake.  If any of the piping gel has gone onto the back or off the sides of the block, the blocks will adhere to the surface you have them on.  Instead, cut out all of the blocks, attach the letters and only  apply the edge gel and sugar just before placing them on the cake.  To get the spacing nice, I put my little paper mockups on the cake, and then replaced each one with the Sugar Sheet block.  That way it was easy to see which block went where.

Making the blanket:


I used the blanket to hide the little cardboard round that the bear was on.  I was afraid that the bear might sink into the cake, so I put 3 straws into the cake (cut even to the top of the cake) to support him, and then the bear was on a 3-inch round cardboard that I found at Michael's Craft Store.


To get the correct size, I just kept adding strips to the blanket until it covered the cardboard.


To begin making the blanket, sprinkle a work surface with powdered sugar and roll a piece of fondant to  just thicker than 1/16-inch.  Cut out strips, about 1/8-inch wide.


Lay the strips horizontally, and  weave 1 strip through the others so that one horizontal is on top and one on bottom, alternating until the whole strip has been woven.


Fold back the strips that are underneath the vertical strip.


Place on another vertical strip, close to the first one.


Fold down the strips that were up, so you now have two strips that are woven.  Fold up the strips that are underneath, and repeat the whole process.  Move the strips close to each other after they are woven in.


When the blanket is the size you want, press down on it to mesh it all together nicely.

Cut the tails to an even length.  To make the fringe, make small cuts into the tails with a knife.  Slide the blanket onto a small round or square cardboard so that you can move it, and so that it provides a nice base for whatever will go on top of it.

For the cake I used the chocolate cake recipe from my wedding cake (http://amazingdessertrecipes.blogspot.com/2009/06/tales-of-tiered-cake-final-recipes.html) . I used a nail rose in the center of each to make sure that the cake cooked evenly in the middle (don't forget to remove it when you flip the cake out of the pan!).  It worked beautifully.  A center cone would also work, but then you have to put in a plug, so I prefer the nail method.  The frosting was an easy marshmallow meringue buttercream- see http://amazingdessertrecipes.blogspot.com/2010/02/valentines-day-layer-cake.html.  Leave out the cassis and use the powdered sugar and corn syrup sparingly, to taste.  Don't forget that you'll have the sweet fondant on the outside, so you don't want the frosting too sweet.  Some people won't eat the fondant, though, so it should be sweet enough.  You'll need a double recipe (3 pounds Marshmallow Fluff).


miércoles, 13 de junio de 2012

AVAL KESARI / POHA KESARI

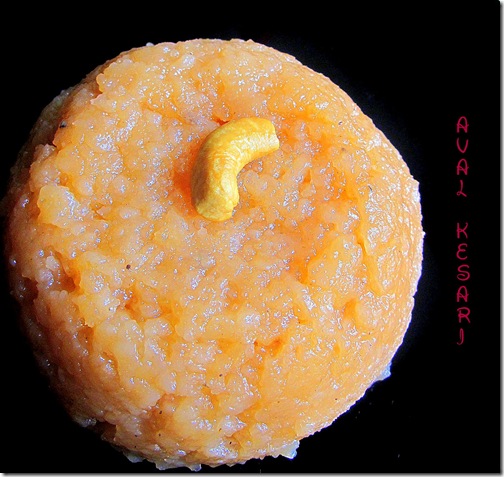
I came to know about this kesari from my school friend Swarna.It was very new to me because i've tasted kesari made with rava / semiya. When she told about this i found it interesting. I made for my friday pooja . It came out well and tasted excellent. We loved it.Its very simple to do. Try this and let me know ladies !!

AVAL KESARI 1

INGREDIENTS

  • POHA / THICK AVAL - 1/2 cup
  • Sugar - 3/4 cup ( Add  1 tbsp less if u want mild sweet)
  • Water - 3/4 cup ( U can replace water with milk too )
  • Ghee - 2 -3 tbsp
  • Cardamom powder - 1/4 tsp
  • Cashews - A few
  • Orange -red food color / Kesari color - a pinch

METHOD

  • Heat a kadai with a tbsp of ghee and fry the cashews. Remove and set aside.
  • Now add the aval/poha in the same kadai and fry till it gets roasted with a nice aroma.U can add another tbsp of ghee while roasting.
  • Now soak the roasted poha in little water for 10 mins to make it soft. This enhances quick cooking. ( Add the water just to cover the poha)
  • Take the measured water in a bowl by adding food color.Allow it to boil
  • Now add the roasted poha and Cover cook for 10 mins stirring in between.
  • Once the poha gets cooked, add sugar and mix well.
  • Add a tbsp of ghee at this stage. Mix well.
  • Stir constantly for few minutes ( may be 10 - 12 mins).At one stage the kesari becomes non sticky and leaves the sides of the pan.
  • Add the roasted cashews and cardamom powder . Mix well and transfer to a bowl .

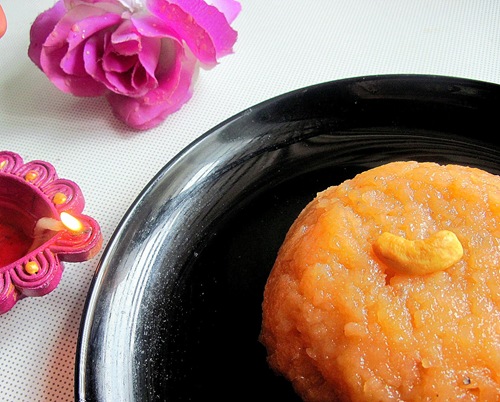
Serve hot !!

aval kesari

TIPS :

  • I wanted mine to be mushy .So i soaked poha for more time and added 1/4 cup more water while cooking .
  • Here I've mentioned the actual ratio given by my friend.So adjust the sugar & water ratio accordingly .
  • Add more ghee while u make for ur guests ;)


martes, 12 de junio de 2012

Hachis parmentier (aka French shepherd's pie)


I've been thinking of making this French take on shepherds pie for a while but what prompted it was having a large bunch of parsley in the fridge. (You can't win with herbs - either you get a ridiculously small packet that costs the earth or a huge bunch that you end up wasting.)

There are of course many ways of making hachis parmentier which is basically a leftovers dish. A lot of recipes base it on a stew but you can make it with mince which is what I've done here having picked up a cut price pack in the Co-op reduced from £2.50 to £1.65. You can add some fried onion and garlic to it (which I did) and some finely chopped carrot and celery if you want. You don't really want it gravy-ish so chuck in half a glass of red wine if you have some and a splash of beef or chicken stock. (It's worth keeping frozen stock in an ice-cube tray when you need this kind of amount.)

The parsley is a touch I remember from a French cookery writer called Mireille Johnston who presented a BBC series back in the 90s. The books that accompanied the series were great but I left the relevant one in France so had to cook it from memory. If your kids don't like 'green bits' as many children don't you could cut the amount of parsley back to a single layer or mix it up with the mince so they don't (hopefully) notice, although, of course, the little blighters always do.

I can't remember if it had a layer of mash at the bottom of the dish but it's a good idea because you get some delicious stuck on crusty bits at the bottom of the pie.

Hachis Parmentier
Serves 2-4 depending on whether teenage boys are involved
2-3 tbsp light olive or sunflower oil
450g minced beef or lamb
1 medium onion, peeled and finely chopped
2 cloves of garlic, peeled and crushed
1 level tbsp tomato paste
75ml beef or chicken stock (or frozen stock cubes)*
75ml red wine (or 1 tbsp red wine vinegar and an extra 75ml of beef stock)
Pinch of cinnamon
Salt and freshly ground black pepper
A good big handful of fresh parsley, stalks removed and finely chopped

For the potato topping
800g boiling potatoes, peeled and cut into even-sized pieces (halves or quarters depending on size)
25g soft butter
A good splash of warm milk (about 3 tbsp)
40g comté, gruyère or cheddar cheese (optional)
Salt and pepper

You will also need a medium sized shallow baking dish (I used a rectangular dish that was 26cm x 21cm)

Heat a large frying pan, add 1 tbsp of the oil and fry half the mince until lightly browned. Remove the meat with a slotted spoon, letting the fat run back into the pan then discard the fat. Add the remaining mince to the pan, brown it and drain off the fat in a similar way. Add the remaining oil and fry the onion over a low heat for about 5 minutes until soft. Stir in the crushed garlic and tomato paste and cook for a few seconds. then add the wine, if using and beef or chicken stock. Tip the mince back in the pan, bring to simmering point then season with salt, pepper and a pinch of cinnamon. Turn the heat right down and leave on a low heat for about 20 minutes. (If it gets a bit dry add an extra splash of stock or some of the potato cooking water.)

Meanwhile put the potatoes in a saucepan, cover with cold water and bring to the boil. Cook for about 20 minutes until you can stick the point of a knife in them easily. Drain the potatoes, return them to the pan and cut them up roughly with a knife. Mash them thoroughly with a potato masher or fork. Beat in the butter and warm milk. Season with salt and pepper.


Preheat the oven to 200°C/400°F/Gas 6. Butter your ovenproof dish well and cover the base with a thin layer of mash (just over a third of the total). Sprinkle half the parsley over the top (as above) then cover with the mince. Add the remaining parsley then and spread the potato evenly over the top, roughing up the surface with the prongs of a fork. Sprinkle with grated cheese, if using. Place the dish on a baking tray and bake for 25-30 minutes until the top is crisp and brown. (If you make it ahead and cool it down before baking it it'll take more like 45 minutes)

* when you make a batch of stock it's worth reducing it then freezing it in an ice cube tray when you need a small amount of stock for a recipe like this

sábado, 9 de junio de 2012

Cleaning up vegetable scraps

It is a bad idea to leave vegetable, fruit, and meat trimmings sitting in the garbage pail for too long, as they will begin to break down and smell. To solve this problem, wrap the handles of a plastic grocery bag around the corners of a drawer beneath her work surface and closes the drawer. The bag stays open so that scraps can be swept right in. when she is finished, she simply ties the handles together and disposes of the whole package.

Chef Osama  

Similar Posts:    
 

Blanching cabbage leaves
Cleaning up spilled oils
Storing Fruits and Vegetables in the Fridge
Simple ways to cook dry beans
10 Random Cooking Tips and Tricks
How To Choose Extra Virgin Olive Oil 

Save and share Cleaning up vegetable scraps

 Want to share these tips with your family and friends? Click the button below to send them an email or save this to your favorite social network.